There are four types of calibration errors, namely zero,span,linearity and hysteresis. It is important to identify and correction of instrument calibration errors for accurate measurement of physical quantities.
Instrument calibration is a procedure that certifies the measurement obtained by an instrument is compatible with what is expected and is suitable for use to avoid deviations in the analysis of processes and reduce costs.
Generally, it compares the results obtained by the instruments with those obtained by standards under pre-established and controlled conditions.
During calibration, a technician encounters certain errors such as zero error, span error, linearity, and hysteresis that are classified to understand and rectify. Actually, the most common calibration errors are a combination of zero, span, linearity, and hysteresis problems.
The equation below describes the response of any linear instrument, that is
y = mx +b
Where
y = Instrument output signal
m = Span value
x = Instrument input signal
b = value of zero
Reasons for Calibration Error
The followings are the reasons.
- Changes in temperature and humidity
- Sudden mechanical shock or viberation
- Sudden electrical shock
- Exposure to harsh condition, like corrosive materials or extreme temperatures.
- Natural calibration degradation with frequent use of instrument over time
Types of Calibration Errors
In this article, we will discuss the following four types of calibration errors in measuring instrument.
- Zero-offset Error
- Span-offset Error
- Linearity Error
- Hysteresis Error
1. Zero-offset Calibration Error
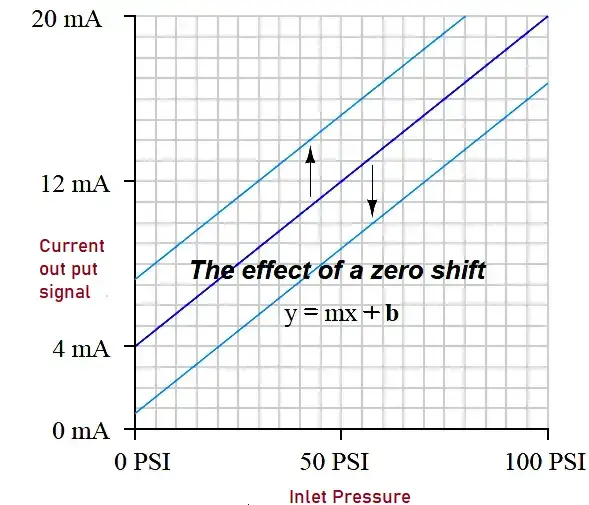
A zero-offset error causes a vertical offset or displacement of the graph of the equation, which is equivalent to modifying the value of “b” of the equation. The error caused by zero-offset error is shown in the below graph.

This error affects all the calibration points or values in the same way, causing the same error percentage within all the points or values of the instrument’s range.
If a transmitter has a zero-calibration error, that error can be corrected by carefully adjusting the “zero” until reaching the ideal response, essentially altering the value of “b” from the linear equation.
2. Span-offset Error

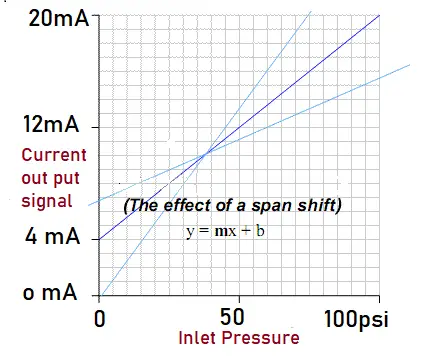
A span offset error causes the slope of the function to change, which is equivalent to changing the value of m in the linear equation. This error affects unequally at different values or points through the range of the instrument.
Transmitters with span calibration errors can be corrected by carefully adjusting the span until an ideal response is achieved, essentially altering the value of “m.”
3. Linearity Calibration Error
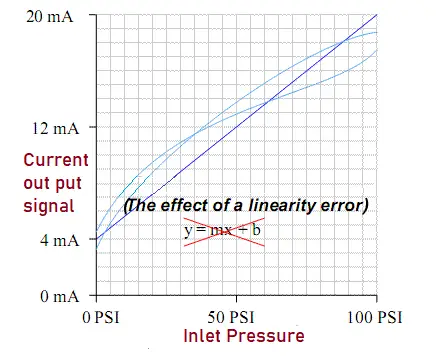
The maximum deviation of the instrument response curve from the linear fitted curve is known the linearity error. The relationship between the input and output can deviate from the linear relationship due to various factors like variation in manufacturing, environment conditions. and radio frequency and electromagnetic noises.

A linearity error in a calibration causes the response function of the instrument to stop being a straight line. This kind of error is not directly related to zero (b) or span (m) offsets because the above equation only describes straight lines.
Some instruments provide the possibility of adjusting the linear response. In this case, this parameter must be modified with extreme care. The behavior of the linearity adjustment is unique for each instrument model. Therefore, we must consult the manufacturer’s documentation to know the details.
How does this parameter work exactly? If the instrument does not provide the possibility of modifying its linearity, the best we can do when faced with this type of error is to “divide or split the error” between the high and low ends of the range. Therefore, the maximum error at any point in the range will be minimized.
4. Hysteresis Error

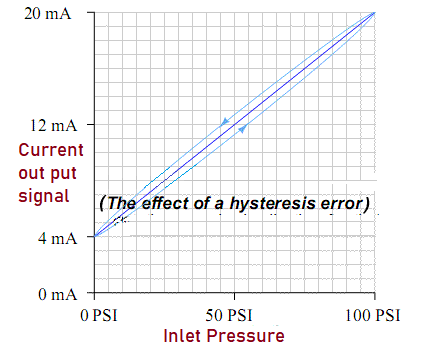
A hysteresis calibration error occurs when the response of the instrument at certain points or values is different when increasing the input signal than when decreasing the input signal. In other words, A hysteresis calibration error creeps when the instrument has different resposnse for an increasing input compared to a decreasing input The only way to detect this type of error is to do an up-down test. In this test the measurement value is recorded when the input signal increases and compare them with the same values but decreasing the input signal.
They are almost always caused by mechanical friction of the sensor elements such as bourdon tubes, bellows, diaphragms, pivots, etc. The friction always acts in the opposite direction to that of the relative motion. Because of this reason, the instrument register false measurement value, low on a rising stimulus and high on a falling stimulus.
The instruments has a Flexible metal strips called flexures for achieving the frictionless pivot points in mechanical instruments. If flexures gets bent or cracked it can also cause hysteresis error in measurement. The hysteresis error can be corrected by the following ways.
- Calibration Adjustement
- Correction of Coupling problems of instrument mechanism
- Replacement of defective parts
In practice, the most common calibration errors are a combination of zero, span, linearity, and hysteresis problems.